i don't like eye candy. compiz, wobbly windows, shadows, fading, taskbar previews; they all just annoy me. i want my computer to do what i'm asking it, and now. i run a slightly minimal desktop, with just openbox to manage windows, a gnome-panel for tasks and systray, and nautilus to put files on the desktop
despite this approach, proper window transparency is a useful feature. i spend most of my work day going between a terminal and configuration files, so it is good to have a semi-transparent terminal in front, and the file i'm working on behind, that i can read off (yes, two monitors would be more useful). how can we get this effect, without all the other useless cruft?
enter xcompmgr. this useful app handles compositing, without replacing the existing window manager. install it with sudo apt-get install xcompmgr, and run with just xcompmgr
start up a gnome-terminal (or stjerm), and set transparency to about 80%. move that window over some other windows or icons, and enjoy actual proper window transparency!
xcompmgr can also do drop shadows, and combined with transset, can be setup to make your windows transparent too. i'm not so into this, but there's a good summary on urukrama's openbox guide
Wednesday, November 26, 2008
Friday, November 21, 2008
mapping middle-click to a keyboard key
Update 2012: Some of these components have been deprecated and removed from newer distributions. Check this newer post for a different method.
One of the biggest things I miss when using my laptop is the ability to select text in one window, then middle-click paste it into another. Sure, I can push both buttons together, but that requires a degree of accuracy, and it's supposed to be a quick, one-finger action, not a move-two-hands affair. I can imagine this would be infinitely useful using Linux on a Macbook too, as they don't even have right-click. I started looking round for a solution to this problem, and eventually found it.
First, we need install an old accessibility extension to X which is called xkbset. In Ubuntu or Debian, just sudo apt-get install xkbset. The original idea of this software is to provide support for people who might not be able to use a mouse or keyboard so well, so it enables things like MouseKeys (control the cursor with the numpad) and StickyKeys (hit shift, lift off, type a letter, get a capital), and SlowKeys (only register a keypress after a certain amount of time). But we're going to use it to map a keyboard key to a mouse button with MouseKeys.
First, we'll get rid of all the cursor-control stuff, so you can still use your numpad. As root, edit the file /usr/share/X11/xkb/compat/mousekeys and remove everything between interpret.repeat= False; and // New Keysym Actions. Notice this maps some new "keysym" actions below, specifically the one called Pointer_Button2.
Next, we'll make a script to configure xkbset, to turn MouseKeys on, to not turn it off after a period of inactivity, and to map a key of your choice to middle-click. Here's my ~/.middle-click.sh:
For the Mac users, left-click is button 1, and right-click is button 3. If I was using a Mac, I imagine I'd map Right Command to Button2, and Right Option to Button3. I hope the right side of these buttons has a different keycode to the left side. If not, I've read of people using F11 and/or F12. man xmodmap will tell you how to use a modifier like Cmd+F12 if you so desire.
Under Gnome, I use System -> Preferences -> Sessions to start this script as I log in, so I don't have to worry about it again. Don't forget to make your script executable with chmod +x ~/.middle-click.sh
One of the biggest things I miss when using my laptop is the ability to select text in one window, then middle-click paste it into another. Sure, I can push both buttons together, but that requires a degree of accuracy, and it's supposed to be a quick, one-finger action, not a move-two-hands affair. I can imagine this would be infinitely useful using Linux on a Macbook too, as they don't even have right-click. I started looking round for a solution to this problem, and eventually found it.
First, we need install an old accessibility extension to X which is called xkbset. In Ubuntu or Debian, just sudo apt-get install xkbset. The original idea of this software is to provide support for people who might not be able to use a mouse or keyboard so well, so it enables things like MouseKeys (control the cursor with the numpad) and StickyKeys (hit shift, lift off, type a letter, get a capital), and SlowKeys (only register a keypress after a certain amount of time). But we're going to use it to map a keyboard key to a mouse button with MouseKeys.
First, we'll get rid of all the cursor-control stuff, so you can still use your numpad. As root, edit the file /usr/share/X11/xkb/compat/mousekeys and remove everything between interpret.repeat= False; and // New Keysym Actions. Notice this maps some new "keysym" actions below, specifically the one called Pointer_Button2.
Next, we'll make a script to configure xkbset, to turn MouseKeys on, to not turn it off after a period of inactivity, and to map a key of your choice to middle-click. Here's my ~/.middle-click.sh:
#!/bin/bash
# set XKB layout
setxkbmap -layout us
# turn on mousekeys
xkbset m
# stop mousekeys expiring after a timeout
xkbset exp =m
# map keysym to other keysym
xmodmap -e "keysym Menu = Pointer_Button2"
# this also works
# xmodmap -e "keycode 135 = Pointer_Button2"
This maps the Menu key (it's between Right Alt and Right Ctrl on my keyboard, looks like a menu with a mouse cursor) to mouse button 2, which is middle click. Notice I can also use any other key on the keyboard, by commenting out the keysym line, and using the keycode line. Keycodes are different from keyboard to keyboard, so to get the keycode of the key you wish to use, run xev in a terminal, push the key you desire, and watch the terminal output.
For the Mac users, left-click is button 1, and right-click is button 3. If I was using a Mac, I imagine I'd map Right Command to Button2, and Right Option to Button3. I hope the right side of these buttons has a different keycode to the left side. If not, I've read of people using F11 and/or F12. man xmodmap will tell you how to use a modifier like Cmd+F12 if you so desire.
Under Gnome, I use System -> Preferences -> Sessions to start this script as I log in, so I don't have to worry about it again. Don't forget to make your script executable with chmod +x ~/.middle-click.sh
stjerm - a lightweight dropdown terminal
stjerm is a lightweight, dropdown (aka: quake-style) terminal emulator. it's great for those times when you quickly need a full terminal to do something (like a grep or convert) for just a few seconds. here's a quick preview:

it's quite lightweight, built with gtk2, and even supports tabs. it's available in ubuntu intrepid with just sudo apt-get install stjerm, or source is here at googlecode
to launch it, run it at least with the option stjerm -k f12, and hit the F12 key to hide and show the terminal. a man stjerm will show all options, and you can save your setup in ~/.Xdefaults, here's mine:
stjerm.key: f12
stjerm.mod: control
stjerm.background: #000000
stjerm.foreground: #44ddff
stjerm.opacity: 80
stjerm.lines: 50000
stjerm.width: 1024
stjerm.height: 768
to get stjerm running in ubuntu hardy or debian, install the build dependencies and tools (sudo apt-get install automake libvte-dev libgtk2.0-dev), and follow the installation guide in the stjerm wiki to compile and install
Thursday, November 20, 2008
basic debian package maintenance
i've been looking at how to tidy my pc up a bit lately, and this is more or less what i came up with, with a bit of help from deborphan, which tells you libraries/packages that are installed but have no dependencies. install it with sudo apt-get install deborphan
firstly, run deborphan to see what lone libraries you have installed. you can also append --guess-data to try guessing data files, and --guess-all too. there are more options in the man page, such as the -e (exclude) and -A (add to exclude list) switches, useful if you have some independent packages installed that you need (like my libmotif3 for the citrix client)
if you're happy with that list, nest the program in apt-get with sudo apt-get purge `deborphan` (the backquotes will use the output of deborphan as the input for apt-get). once these packages have been removed, run deborphan again, and see if you've uncovered any deeper nested depends. if you're really keen, you can script it like so:
#!/bin/sh
while [ -n "`deborphan`" ]; do
deborphan
echo
apt-get purge `deborphan`
done
at times, apt-get will know that it doesn't need packages anymore either, and will tell you so when you run it. you can get rid of these packages with the sudo apt-get autoremove command
your system will also build up an apt cache of packages, especially as upgrades happen over time. you can clear these out with sudo apt-get autoclean, which removes packages that are out of date, or just sudo apt-get clean, which removes everything except the lockfile from the apt cache
so in summary:
sudo apt-get autoremove
deborphan
sudo apt-get purge `deborphan` till you have no packages
sudo apt-get clean
Monday, November 17, 2008
Cannot unmount volume - Cannot remove directory
Often when unplugging my USB thumb drive, I get a dialog box saying

I started looking into why this is, and found that duplicate entries in /media/.hal-mtab are to blame, probably from situations where my drives have either not mounted or unmounted properly.
The fix is easy, simply unmount any extra drives, and sudo rm /media/.hal-mtab
Problem solved!

I started looking into why this is, and found that duplicate entries in /media/.hal-mtab are to blame, probably from situations where my drives have either not mounted or unmounted properly.
The fix is easy, simply unmount any extra drives, and sudo rm /media/.hal-mtab
Problem solved!
Monday, November 10, 2008
Font DPI broken in Intrepid
I upgraded my laptop (a Dell Vostro 1200) to Ubuntu Intrepid, and found my fonts in both GDM and Openbox were 2 sizes larger than expected. This made things look awful, so I started hunting around for a fix.
Fonts should be 96x96 DPI, for this, both the video driver and X need to know how physically large your screen is, in addition to the resolution they're displaying. xdpyinfo | grep dimensions reported the correct screen size in mm I was expecting, but cat /var/log/Xorg.0.log | grep DPI reported that the intel(0) driver was seeing a DPI of 95x153!!!
After browsing Ubuntu's Launchpad and the Arch Linux Wiki for a while, I found it seems to be a bug in the Xorg Intel video driver, specifically that it can't read the resolution information from my laptop's LCD panel properly.
My fix for this was by editing my /etc/X11/xorg.conf file, and adding these lines to the Device and Monitor sections:
Section "Device"
... existing info here...
Option "Monitor-LVDS" "Configured Monitor"
EndSection
Section "Monitor"
... existing info here ...
Identifier "Configured Monitor"
DisplaySize 339 212
EndSection
If you have a different resolution than 1280x800, you can calculate these values with the formula pixels*25.4/dpi and always round down. eg: 1024*25.4/96=270
Apparently if you have a nVidia card, using the nvidia binary driver, these options work:
Section "Device"
... existing info here ...
Option "UseEdidDpi" "false"
Option "DPI" "96 x 96"
EndSection
Others have also reported that starting X with a manual DPI setting can work. You can do this by editing /etc/gdm/gdm.conf and finding this:
command=/usr/X11R6/bin/X -br -audit 0
and adding -dpi 96 on the end, so you get this
command=/usr/X11R6/bin/X -br -audit 0 -dpi 96
However, this did not work for me.
Some people have found that specifying Option "NoDDC" "true" in the Monitor/Device sections of their xorg.conf fixes this too. DDC is a protocol that reads extended information from your monitor that could be important (resolutions, refresh rates) so disabling it isn't really a "fix" as such. I don't recommend disabling DDC, especially if you are using a CRT which could be fried by an incorrect refresh rate.
The fix, either Intel's Monitor-LVDS command, nVidia's UseEdidDpi False, or starting X with a manual DPI, seems to be dependent on which video card and driver you are using. Out of interest, the fbdev driver (framebuffer, displays usplash and Ctrl+Alt+F1 terminals) would read DPI properly, but was restricted to 1024x786 res only.
Monday, October 20, 2008
Split rar files
Ever downloaded a file larger than 4Gb, then gone to copy it to a FAT32 USB drive? Unfortunately, FAT32 has a max filesize of 4Gb, so the operation fails.
One way of getting around this is compressing the file, in the hope that it gets small enough. If this still doesn't work, where does that leave you?
Using rar on the commandline, you are able to split files easily and quickly, for copying off to other sources.
First, install rar with sudo apt-get install rar
Usage is as easy as rar a -m5 -v500M archive.rar file.ext
rar starts the command
the a switch tells it to "add to archive"
-m5 is the compression level (0 don't compress, 3 default, 5 best compression but takes longest)
-v500M specifies volume size to 500Mb, you can also use something like -v512k for 512kbyte volumes, or -v5b for 5 byte volumes
You name your resulting archive with the name archive.rar (or whatever you'd like)
And the file you intend to compress with file.ext
You can also specify a folder as the target, just add a -R before the archive name to recurse subdirectories
To uncompress, right click on the first part01.rar file and choose Extract, or type rar x archive.part01.rar at the commandline
Friday, October 17, 2008
Swappiness
I was reading through the Ubuntu Swap FAQ, and thought I'd make a note on swappiness, which is a configurable value of how much the system should rely on swap space instead of real RAM. Personally, I wish my the computer would never use swap. From the FAQ:
cat /proc/sys/vm/swappiness
A temporary change (lost at reboot) can be made with:
sudo sysctl vm.swappiness=10
To make the changes permanent, edit this file:
sudo gedit /etc/sysctl.conf
And edit the value
vm.swappiness=10
(if this value doesn't exist, create it at the end of the file)
Changes will apply at next reboot.
swappiness can have a value of between 0 and 100
swappiness=0 tells the kernel to avoid swapping processes out of physical memory for as long as possible
swappiness=100 tells the kernel to aggressively swap processes out of physical memory and move them to swap cache
Ubuntu uses a default setting of swappiness=60
cat /proc/sys/vm/swappiness
A temporary change (lost at reboot) can be made with:
sudo sysctl vm.swappiness=10
To make the changes permanent, edit this file:
sudo gedit /etc/sysctl.conf
And edit the value
vm.swappiness=10
(if this value doesn't exist, create it at the end of the file)
Changes will apply at next reboot.
Thursday, October 16, 2008
VirtualBox: Spawning Session
After a recent kernel upgrade, I found my VirtualBox 2.0 stopped launching VMs, and would just sit there with a dialog saying "Spawning Session" and a progresss bar which never went past 0%.
A quick look on Ubuntuforums and I found others are having the same problem. Turns out the kernel module hasn't loaded. We can force a recompile with this command:
sudo /etc/init.d/vboxdrv setup
It then stops, recompiles, and starts the module:
* Stopping VirtualBox kernel module
* done.
* Recompiling VirtualBox kernel module
* done.
* Starting VirtualBox kernel module
* done.
And VirtualBox is working again!
Monday, October 13, 2008
User's $HOME/.dmrc file is being ignored
There's been a few users on Ubuntuforums, myself included, who have had this error pop up as they log in:
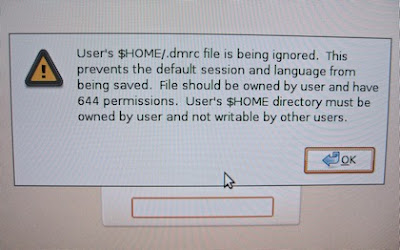
The error seems pretty obvious, that the file listed ~/.dmrc has the wrong permissions. The fix for this is easy, at a terminal, do the following, replacing the word username with your username:
sudo chown username /home/username/.dmrc
chmod 644 /home/username/.dmrc
Except I don't have a .dmrc file to do this to, so what could be causing the error? After a bit of hunting around, I found this can also pop up if your home directory has global write permissions. The fix for this is just as easy. Again at a terminal:
sudo chmod 755 /home/username/
which gives other users read access to your home directory. Or if you'd prefer it private, then
sudo chmod 700 /home/username/
will work as well.
Log out, log in again, and the error screen should go away!
Sunday, October 12, 2008
Nautilus Trash won't empty?
Every now and then, I get a file in my Trash/Garbagebin which just won't go away. I'm guessing there's a file somewhere which my user doesn't have permission to delete, but wound up in the bin anyway?
It's easily fixed tho, it just needs a root user to go into the Trash folder, and delete manually. One can accomplish this with the command:
gksu nautilus /home/username/.local/share/Trash/files
and remove whatever you find.
It's easily fixed tho, it just needs a root user to go into the Trash folder, and delete manually. One can accomplish this with the command:
gksu nautilus /home/username/.local/share/Trash/files
and remove whatever you find.
Tuesday, October 7, 2008
Screenshots at the commandline
Making a screenshot in X is easy - GNOME has the Print Screen option, and there's always the scrot application.
But how to make a screenshot without X, when just working in the console?
Everything in the console is displayed in the framebuffer, and fbgrab enables you to make a screenshot of this.
Usage is easy, just:
fbgrab filename.png
But how to make a screenshot without X, when just working in the console?
Everything in the console is displayed in the framebuffer, and fbgrab enables you to make a screenshot of this.
Usage is easy, just:
fbgrab filename.png
Saturday, September 20, 2008
Window control with wmctrl
wmctrl is a useful little commandline tool for manipulating windows. it works with any window manager that complies to the freedesktop.org spec, which is most common ones
to install it within a debian-based distro, just type sudo apt-get install wmctrl
what can it do? alot, but i mostly use it for resizing windows to certain sizes (which can be useful for testing a web layout in smaller resolutions), positioning windows at a particular place on the monitor, and for "shading" windows, which means drawing the window up to the titlebar
to see what windows wmctrl can see, type wmctrl -l in a terminal, you'll get a list like this:
jamie@one:~$ wmctrl -l
0x01000003 -1 one Bottom Expanded Edge Panel
0x0100002a -1 one Bottom Expanded Edge Panel
0x0120001f -1 one Desktop
0x028000c8 0 one : Linux Aleph : Tips for using Linux - Mozilla Firefox
0x03200021 0 one jamie@one: ~
so you can see a window ID, a number which is the workspace the window appears on (-1 means "sticky" on all workspaces), the X server the window is running on (my PC's hostname is "one"), and the window titles
to address a window, you can either use the window ID, or do a match on part of the title. so wmctrl -i -r 0x028000c8 and wmctrl -r Firefox will both address the same window. you can also address windows with -r :ACTIVE:, which is the active window, and -r :SELECT:, which gives you a mouse cursor to choose the window you wish to control
to resize a window, use the -e parameter, with a syntax that goesgravity,x,y,width,height, and a -1 option leaves a pixel value unchanged
don't worry about changing window gravity, just set it to 0, so to resize our Firefox window inplace to 1024x768, type wmctrl -r Firefox -e 0,-1,-1,1024,768 or to positon a window 100 pixels in without resizing it, use the command wmctrl -r Firefox -e 0,100,100,-1,-1
to change window shading, use the option -b toggle,shaded, you could even bind this to a keystroke (like Ctrl-Escape) to make it easy to get to quickly
there is alot more wmctrl can do, such as maximising, minimising, changing titles, the list goes on. type man wmctrl in a terminal to find out more
to install it within a debian-based distro, just type sudo apt-get install wmctrl
what can it do? alot, but i mostly use it for resizing windows to certain sizes (which can be useful for testing a web layout in smaller resolutions), positioning windows at a particular place on the monitor, and for "shading" windows, which means drawing the window up to the titlebar
to see what windows wmctrl can see, type wmctrl -l in a terminal, you'll get a list like this:
jamie@one:~$ wmctrl -l
0x01000003 -1 one Bottom Expanded Edge Panel
0x0100002a -1 one Bottom Expanded Edge Panel
0x0120001f -1 one Desktop
0x028000c8 0 one : Linux Aleph : Tips for using Linux - Mozilla Firefox
0x03200021 0 one jamie@one: ~
so you can see a window ID, a number which is the workspace the window appears on (-1 means "sticky" on all workspaces), the X server the window is running on (my PC's hostname is "one"), and the window titles
to address a window, you can either use the window ID, or do a match on part of the title. so wmctrl -i -r 0x028000c8 and wmctrl -r Firefox will both address the same window. you can also address windows with -r :ACTIVE:, which is the active window, and -r :SELECT:, which gives you a mouse cursor to choose the window you wish to control
to resize a window, use the -e parameter, with a syntax that goes
don't worry about changing window gravity, just set it to 0, so to resize our Firefox window inplace to 1024x768, type wmctrl -r Firefox -e 0,-1,-1,1024,768 or to positon a window 100 pixels in without resizing it, use the command wmctrl -r Firefox -e 0,100,100,-1,-1
to change window shading, use the option -b toggle,shaded, you could even bind this to a keystroke (like Ctrl-Escape) to make it easy to get to quickly
there is alot more wmctrl can do, such as maximising, minimising, changing titles, the list goes on. type man wmctrl in a terminal to find out more
Subscribe to:
Posts (Atom)